Instagram

Instagram
Showing posts with label Blendable. Show all posts

Wednesday, 26 March 2014

Review | MUA 3 in 1 Contour Pens

Hey Guys! Here is my review on the MUA 3 in 1 Contour Pens!

   Shades left to right - Dark Brown, Sea Blue, Black
 
Shade - Sea Blue
 
Shade - Black
 
Shade - Dark Brown
 
Cost - £1.50 e
Shades - 8
Places to Buy - MUA Online
 
Packaging: The packaging on these liners are your typical, plastic automatic pencil style. The twisting mechanism is very sturdy and works very well. The overall feel of the casing doesn't feel cheap at all, even though it is very standard plastic. The writing on the packaging is in silver and I believe it is just printed on, however I have had these liners for a while now and they writing has not rubbed off in any way. The lid clicks onto the tube, this is handy as it means that you know the lid isn't going to pop off the top of the liner, making the liner go all over the rest of your makeup/breaking apart. The 'nib' end of the casing goes inward at the tip to allow the flat shape of the pencil to stay flat and so it can move freely through when twisting to reveal the product. I have had no problems with that casing breaking/cracking/being hard to manage. It looks very sleek and the slim design makes it easy to hold and it fits perfectly in your storage/makeup bag.
 
Texture: The texture of these liners is very soft, silky and creamy. They glide on the eye with no problems, I really like the formula. However, if you have extremely oily eye lids, you may find that you can't use these on the upper lash line without setting them/smudging them out for a smokey look - I don't have extremely oily lids, but they are oily and I have had some problems with them running down my face, however this isn't the case all the time when I use them as a liner on my lash line, it only happens on certain occasions. They are also really great for use on the water line as well, the formula allows them to glide on there without loosing pigmentation and being hard against your eye. The formula and the texture of these liners also mean that the pigmentation is very fluent and you wont find that the colour skips when applying and you will get quite full colour when you use them.
 
When Do I Apply These?: Like all eyeliners, you apply these while you are doing your eye makeup as the name would suggest. If you are applying eyeshadow, you would use these after you have completed that application so you don't loose the colour of the liner/change it. Eyeliners can also be used alone on the eye so, again, you would just use these as you are applying your eye makeup as a whole.
 
I've Applied Too Much!: When you apply too much liner, there isn't a lot you can do and the fixing of it can tend to be quite tricky. I would suggest just using a Q-tip with some eye makeup remover in it and cleaning up the line until you are happy with it, but doing this means that you run the risk of having to touch up the entirety of your makeup as it will get rid of the makeup around/on your eyes. The other option is to simply, make it work! If you've made the line a lot thicker than what you originally wanted it to be, the only real option is that you make the other side just as thick and keep it how it is.
 
Would I Recommend These?: Yes, I would recommend these eyeliners. I think that for the price they are amazing quality, the shade range is mediocre but they have a variety of different colour types so its not that bad. Like I said, if you do have really oily lids, a primer will be needed to control that oil and you may have to set the liners/smudge them for a more smokey look to your liner. The angled shape of the liners makes application even easier and it fits perfectly to the shape of your eye.
 
Hope This Helps!
xox


Tuesday, 25 March 2014

Review | ELF Brightening Eye Color

Hey Guys! So, today I have a review of the ELF Brightening Eye Color (eyeshadow quads).


Shade - Drama
 

Shade - Brownstone
 

Shade - Day 2 Night


Shade - Luxe
 

Shade - Ethereal
Price - £1.50 e
Shades - 14
Places To Buy - ELF UK, ELF USA
 
 
Packaging: The packaging on these eyeshadow quads are extremely standard as far as drugstore palettes are concerned - Plastic. They are made of plastic, the bottom half is a white plastic whereas the top lid part of the palette is clear. The fact the lid is clear is extremely handy so you don't have to memorise names of you quads or open every single one until you find the one you are looking for - the clear plastic allows you to be able to see the colours that are in there, which is perfect if you have a large collection of these shadows. The writing on the front is a silver colour, however don't expect it to stay written on there as it does rub off - I assume it is just sprayed on there. The palettes do feel very cheaply made and packaged but for £1.50/$1, what more can you expect? I don't mind the slightly cheap feel of the compact as the shadows inside are, in my opinion, fantastic. There is a tiny mirror at the bottom of the inside of the compact where the shadows are, when you buy the palette brand new, a sponge tip comes supplied in there. However, I do believe the mirror is massively useless. It is far too small to be able to see what you are doing and gets really messy from the shadows anyway. The triangular shape of the shadows can cause a few problems as you may not be able to get your brush in the single shade and may get a few other shades on the brush, something to think about when buying these - you may need to invest in a smaller/slimmer shadow brush if you don't already possess one as if not you may find yourself being stuck/using your fingers to apply the shades.
 
Texture: In my personal experience, the texture of these shadows vary from quad to quad. Day 2 Night for example, the shades are very pigmented, buttery smooth, and glide on the lid without looking chalky, crumbling or flaking off your lid. However, if we take Ethereal, this is the opposite end of the scale. These shadows are not as greatly pigmented, they are not buttery smooth, still smooth though. They can flake off my lids and appear crumbly if I don't use a very good and tacky base - I particularly like the ELF Glitter Primer for this as it is very sticky and has no colour so it doesn't change the shade of the shadows. Taking Ethereal as an exception, the texture of the majority of these quads are very smooth, pigmented and glide on the lid without any problems. The finishes range from matte, satin, shimmer and glitter - something you may want to look out for when purchasing your quad as well. The texture of the glitter shades can sometimes be quite chunky based on some previous reviews I have read, however this is not the case for all of them, something you may want to read up on. In my personal experience with these shadows, the only quad I have been ever so slightly disappointed with is the quad in Ethereal, however I still like it and this it would be great for beginners as the shades are very neutral and the fact they are not massively pigmented, means they will be much more forgiving if you mess up slightly during application.
 
When do I apply these?: With eyeshadows it honestly doesn't even matter, however there are a few tips I will give you about when to apply certain shadow types/shades. 1. If you are working with very dark/shadows that tend to have a lot of fall out - make sure you do the eyeshadow step first. This is because it will prevent you from spoiling the rest of your face makeup from fall out/smudges of dark shades, and you will find its easier to work with as you can be quite messy and clean it up after you're done, as you wont run the risk of ruining the rest of you makeup. 2.If you are working with light/neutral shades with not a lot of fallout - Your options are wide open. The timing of application doesn't really matter as you will have very slight chances of ruining your makeup that you have already applied. I personally like to apply my shadows after my base makeup (foundation, concealer, powder). This is because I can then work my blush/bronzer/lips around the way I have done my eye makeup. However, you could also do it vice versa - making your eyes match everything else.
 
I've applied too much!: Don't fret! With eyeshadows the way to tone down a look that went a little heavier than expected is simply to take a fluffy brush and keep blending the shades out. This will diffuse the colour and the more you blend - the lighter and sheerer the shades the appear. Keep blending until you are finally happy with the outcome - blending is important on any shadow look anyway but is also a great fix if you have gone too heavy on a look, not just too harsh.
 
Would I recommend these?: Yes! I would recommend these shadows. However, I don't think that all the shades will please everybody and the shade range may not be the widest for some people - the shades do range from neutral, colourful and dark though so, there should be at least one quad that caters to your needs. For £1.50/$1 I honestly don't think you can go wrong, and if you do get a dud palette, it's not a massive loss like it would be if you ended up not liking a Tom Ford quad for example.
 
Hope This Helps!
xoxoxo

Saturday, 30 March 2013

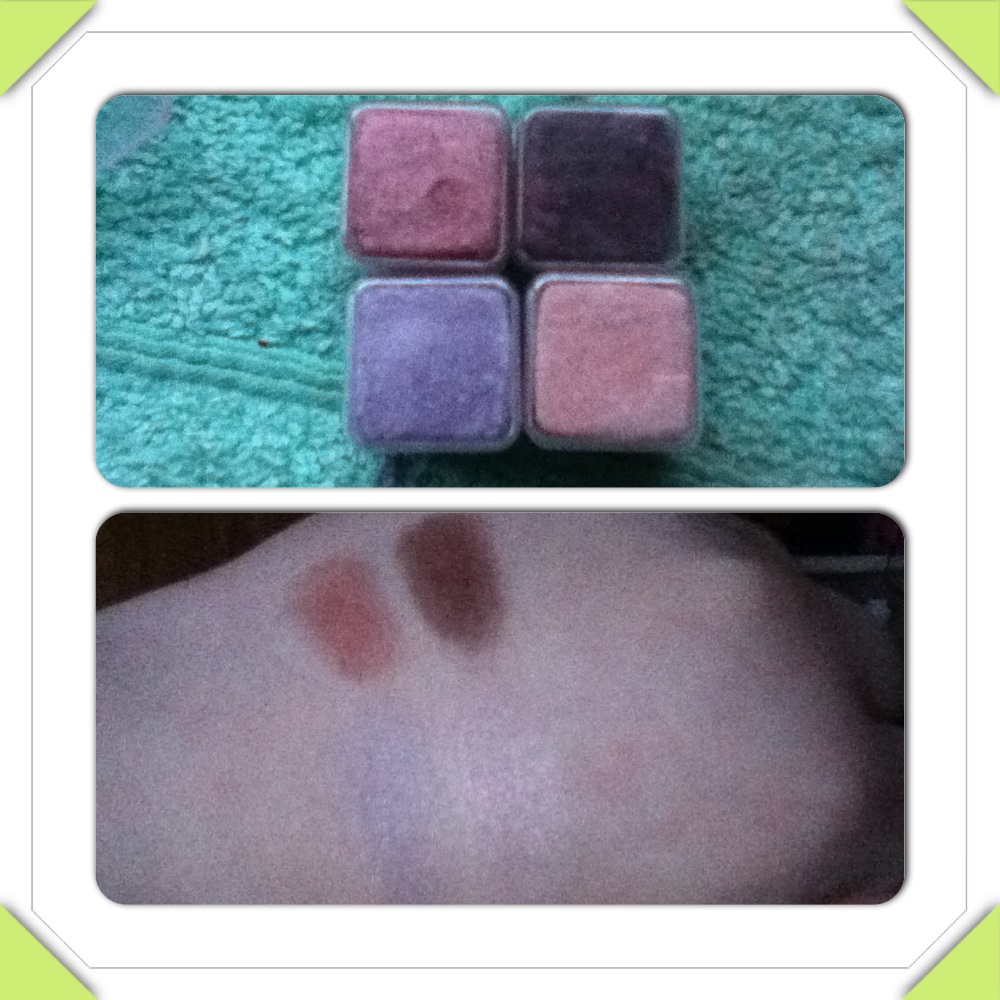
Review | The Body Shop Shimmer Shades - Lilly Cole Collection.

 
Hi! Here is my review on the Lilly Cole Shimmer Shades from The Body Shop. Unfortunately these were Limited Edition so you can not buy these anymore, unless you get lucky in The Body Shop like I did. I got these on sale for £5.00.
 

There is only one shade selection from the Lilly Cole Collection.
Pigmentation - Medium But Buildable.
Price - £16.00
Places To Buy - The Body Shop
 
Packaging - Personally for me, the over all packaging let the product down a bit. I do like the idea that the cubes of shadow are all individual in there own plastic casing. But, it is very cheap packaging. There is nothing special about it, it's just plain, clear plastic. However, like I said, I do like the concept that each shade is individual so you only have to take the colours you need. That idea is very nice and travel friendly. Another thing that lets it down is that it doesn't lock shut, so I can guarantee if this is going on a plane, the shadows will fall out because it doesn't stay shut.
 
Texture - The texture on these are very hard and they are pigmented but not as pigmented as I expected for the regular price. I do think these are hugely over priced and you really are paying for the name over quality. Where I do think these are nice if you just want something nice, light and easy to apply, then these are probably for you. But for me, after trying so many cheaper things, I personally don't think these are worth the money and bought them to try and because they were on sale so I thought it was the perfect opportunity. With them being quite solid, I'm guessing that because of the way they are packaged, they have to be quite solid.
 
I've Applied Too Much! - Just take a blending brush and keep going oer it, this will almost dilute the colour and make it less harsh on your eyes, making a more soft, blended look. If it's the darker colours that you have over done it on, then sometimes just taking the lightest shade and running it over that colour will help meaning you won't have to spend as much time blending out the colour.
 
When Do I Apply These? - Eyeshadows are something hat you can apply whenever you want as they won't get messed with the other products as you probably won't be laying foundation and concealer over it, meaning it will still be there on your eyes. Applying these before your face makeup also helps a lot as if you get any fall out, you won't have to take away any foundation, powder or concealer, so you can just wipe it away at the end and then start your foundation routine. You could also apply them after your face makeup if you prefer, I tend to do this if I know that the eyeshadows won't have much fall down, if you are conscious about this, take a shadow shield under your eye and it will catch any fall out. Or, if you don't have them, you can just hold a tissue/cotton pad under your eye and it will do exactly the same thing.
 
Would I Recommend These? - I wouldn't to everyone. If you are just starting out with make-up and you want something that is easily blended, quite pigmented, and something where it's all there in one place, then I think these are perfect for you. However, if you, like me, have been using make-up for years and know good eyeshadow from bad, or you're a make-up artist, I think there are much better products out there, some cheaper, some the same price, but there are definitely better things out there.
 
Hope This Helps!
xox

Review | ELF Studio Concealer

 
Here is my review on the ELF Studio Concealer.
 
My colour is 'Ivory' - The Lightest Shade.
Price - £3.75
Shades - 4
Coverage - Medium
Places To Buy - ELF Online.
 
Packaging - The packaging on this product is very nice, professional and sleek looking. It has a very slim design meaning it is very travel friendly as it won't take any extra room up in your make-up bag. You don't get much product in the stick though, the amount of product shown is just a bit less than what I got before using it, that could be a down side but for what I use it for, I don't need a lot of product, and there might be more product in the lower part of the casing. It is a simple twist up, type package, pretty standard and what you get for most concealers like this now.
 
 
 Texture - The texture of this concealer stick is creamier than others, some more inexpensive concealer sticks can tend to be quite dry as they don't put a lot of moisturising aspects in the product, it's not the case for this one. I find that this has a medium coverage. I mainly use this for colour correcting under my eyes as the colour is quite orangey, and orange means a salmon colour and that cancels out the darkness under my eyes. The colour range isn't great at only 4 shades and they don't go very pale or very dark, you have to be a light-medium skin tone to be able to use these concealers.
 
 
When Do I Apply This? - If you were using this as a regular concealer I would suggest using this after foundation, as if you would put it on before, the concealer would move and you wouldn't get a lot of coverage out of it. However, because I use this as a corrector, I put this under foundation and use a tiny amount. This won't get rid of the coverage because of the purpose I'm using it for. But, like I said, use this after foundation if the shade matches you so you're using it as a regular concealer.
 
 
I've Applied Too Much! - Don't fret! Make sure you keep blending out, so it doesn't look cakey. Or, you can, again, use a fixing/moisturising mist so it doesn't look too heavy. Also, you can take a tissue and pat over the area where you applied too much, it will absorb the excess product, making sure it doesn't look heavy, cakey and it will look more natural on your skin.
 
Would I Recommend This? - I think I would, however, like I said, I would only recommend it to people who have light-medium skin tones, because otherwise, there won't be a shade for you. These are good quality for the money and think that, depending on your skin tone, you will find that it conceals nicely. For reference, I'm fair skin toned.
 
Hope This Helps!
xox


Friday, 29 March 2013

Review | MUA Blushers

 
Hi! Here is my review on the MUA Blushers!
 

Top Row, Left To Right - Shade 1, Shade 5
Bottom Row, Left To Right - Shade 3, Shade 6
 
Price - £1.00
Shades - 5
Pigmentation - Medium - High Pigmentation, Buildable, Blendable
Places To Buy - MUA Online, Superdrug
 
 
Packaging - The packaging is very standard. It consists of all plastic and, from the time I've had them, it has been quite sturdy. I have had the Shade 1 before and the colour was slightly different from it is now. Also, The packaging was a lot more cheap and broke as soon as I got it home. Now, the packaging is tons more sturdy and hasn't had any breaks, but of course, there is scratches on it from when it's in my make-up bag and make-up storage. Again, the writing on the front is a spray on, in metallic silver. However, this one hasn't rubbed/scratched off yet and I've had these for a while now. I am pleased on the improvements on the packaging and think that more people will buy them now as before, when the packaging broke, so did the product inside.
 
Texture - The texture is more solid than soft. When running my fingers over it it doesn't feel very soft but still has pigment. Don't get me wrong, it is still quite soft, just not as soft as I remembered my old one being. I remembered that being extremely soft. This is more solid, which is a good thing in some ways as it will be less likely to break, meaning it s a lot easier to travel with. However, even though it is quite solid, it manages to still be smooth and pigmented which is why I think for £1.00 they are a steal, people would pay quite a bit more for these.
 
When Do I Apply This? - I, personally, apply these after powder, bronzer and contour. This is so the colour doesn't get hidden by the bronzers, so you can still see all the colour and it doesn't change shade because it is mixing with other things. I use just a regular blush brush, one that feathers the product on, rather than placing the product on to your face really heavily. These are very blendable and easy to work with, meaning they won't get really patchy on your skin.
 
I've Applied Too Much! - Don't worry! I have two solutions. The easiest one is to take your powder brush and go over it, don't add any extra product just use what's left, and run over it. This will make the colour more subtle and blend out the edges. Another option, if you don't have powder/a powder brush, take a tissue and pat over the edges working inwards, this will remove excess product and, again, blend out the edges, making it more subtle on your cheeks. This is also great if you are away and don't want to over pack products.
 
Would I Recommend These? - Yes, definitely! For people on a tight budget I think these are great quality and won't waste your money, even though you are only paying £1.00. These are quite pigmented, some have a nice shimmer, and they look nice, natural and glowy on the cheeks.
 
Hope This Helps!
xox


Review | ELF HD Powder (Studio)

 
Here is my review on the ELF HD Powder! Enjoy!


This is the original product, not the corrective yellow or shimmer one.
 
Price - £6.00
Shades - 3
Pigmentation - Clear/Transparent Formula
Places To Buy - ELF Online
 
Packaging - The packaging on this product is very nice. It has a very heavy duty black tub, which contains a sifter so not too much product is dispersed onto the puff/your brush. Some people may not like the packaging as they might think it is quite bulky, it is something that you need to have the right size storage to hold this product. I like the packaging because I think it looks very appealing and professional on your counter/in your make up storage. It is quite bulky but I really don't mind that as I have big enough storage to hold it in and big enough makeup bags if I want to take it on my travels. The fact that it comes with a puff is also very convenient, it means that if you bring this and you forget your powder brush, depending on the fact that you don't throw your powder puff away, then it won't matter because you can just use that instead.
 
Texture - The texture of this product is extremely silky, smooth and easily blendable. Because the product sys HD, it means that it is less likely to give you the white cast on your face, while still mattifying it. At first, you might think it won't blend because the product is straight up white, however when buffed in or just feathered over your face/skin, you get no white on your face, it becomes completely transparent. It also makes your skin feel extremely smooth. Because it is a translucent powder, you are not going to get any extra coverage out of it, so it does mean that it feels more light weight on your face. When I apply this, it feels like I have nothing on my face. I put this on top of a foundation that was awful for taking photos and lasted on my skin for about 2-3 hours, just to see how well it worked. AMAZING! The foundation looked sooo much better when taking pictures and recording, and it made the length of wear of my foundaton from 2-3 hours, to 5-6 hours, so I think that is a huge plus.
 
When Do I Apply This? You apply this after you have finished your face make-up. (Foundation concealer and any other cream product e.g. blush). The reason being is that it will set your make-up, prolonging the wear of it all and will also make it not as shiny. You could apply this as a last step as a finishing powder, but I just use this as a regular face powder, I think that gives me the best effect. I use the Clinique Powder Brush to apply this, I use it sparingly over the face, but concentrate it a bit more in the areas I have put concealer, so it lasts longer.
 
I've Applied Too Much! -  Don't worry! Take a finishing/moisturising spray and spray your face a couple times. This will prevent anything looking cakey if you have applied too much, and will remove some of the excess product, giving your skin a nice healthy glow at the same time. Fixing sprays are really nice and I have to use them quite a lot if I go a bit happy on the powder! They really do help and that's a solution i've been doing for ages now.
 
Would I Reccomend This Product? - Of course! I think it's great value for the money, helps my make up last all day by actually setting it, stops the terrible white cast/flash back you can get from cameras so, I think it's amazing! Again, the packaging might not be for everyone, but it certainly is for me!
 
Hope This Helps!
xox
 

Wednesday, 27 March 2013

Review | Famous By Sue Moxely Lip Addicts

 
Here is my review on the Famous By Sue Moxely Lip Addicts.
 

Left to right: Raw, Pillow Talk 
Price: £4.99
Shades: 6
Pigmentation: Medium - High Colour Pay Off
Places To Buy: Sue Moxley Online.

Packaging: The packaging on these is very nice. It has a nice, sleek black casing with a flip up lid that contains the same colour of lipstick, but in a Balm Formula. The writing on the front is a pink spray on, which, for me has nearly completely rubbed off. Because of that, I do think companies need to find a different way of writing the name of the product on, like printing/imprinting it on the front of the packaging. The lid shuts nicely, it clicks so you know when it is completely shut and you don't think it's shut, go back to your makeup bag, and find out that your lipstick has mushed all over the place!

Texture: The texture of these lipsticks are very creamy, smooth and very quite pigmented. They glide on your lips nicely. However, I do find that if I don't apply a lip balm before, then it does tend to settle in the lines on my lips where they are dry. They have a nice, demi-matte finish (not glossy but not quite matte). They are pigmented, or at least, the two shades I have.

Ways To Apply: The ways to apply lipstick are very simple. The most common way is just straight out of the tube on to your lips. Which is perfect and easy if you are the only person using the lipstick. For a make-up artist, they tend to use a lip brush for hygiene reasons. The lip brush is the perfect way of getting a more defined lip line, perfect when doing bold lips so you can control the colour. The other way is obviously, you can use your fingers. Not the most hygienic, but more hygienic than putting it straight on your lips, depending on the fact that your hands are clean.

I've Applied Far Too Much Product!: Don't you worry, don't you worry child.....;) Take a plain tissue and blot off your lips, this will take away the top layer of colour, making your lip colour less intense and also last longer as it becomes closer to a stain than a lipstick. Or, you can take your finger and rub over the lipstick, this will blend out the colour making it more subtle.

When Do I Apply These?: You can apply lipstick really anytime you like. Personally, I like to apply it last so I can get the most wear out of the colour. However, if you're more of a match your eyes to your lips kind of person, then apply it after face makeup, before your eye make-up. For me, I like to match my lips to my eyes so I apply it last. But really you can apply it at any time you want to.

Would I Recommend These?: Of course I would! I think they are so creamy and worth the money. However, if you have a lot of fine lines on your lips that are quite thin in width, but quite deep set, then I think that these won't work for you as they would just settle in them after lip balm.

Hope This Helps!
xox


Monday, 25 March 2013

Review | ELF Baked Eyeshadows (Studio)

Here is my review on the ELF Baked Eyeshadows!


Left to right: Burnt Plum, Pixie
Price:£3.75
Shades:6
Pigmentation: Medium-High Pigmentation, Buildable.
Places to buy: ELF Online
 
 
Packaging: The packaging on these shadows, again, are pretty standard and kind of cheapy feeling because of the plastic. However, saying this, the black, back part of the packaging has a nice kind of rubbery, velvet feeling (very similar to the NARS packaging) which to me is a nice chance and makes it feel a lot less cheap and flimsy. I have had these since Christmas and they have not broken, or even scratched in any way. The writing on the top of the clear, plastic covering is very much like the MUA Blush Perfection in the sense that it is a spray. However, the writing on these had not rubbed/come off in anyway, it has held up very well. Now, my only complaint about the packaging is that when I received mine, the sticker on the back only consisted of a number and not a name. This is a bad thing as it means that you will either have to remember the name, or make your own sticker with the name on it and stick it on the back of the casing. 


Texture: The texture of these eyeshadows are very soft and silky, not powdery at all. They apply very evenly to the eye, I don't have a problem with drag marks/the shadow going patchy like I do with some baked shadows that I have owned in the past. They are extremely pigmented shades and you don't need to run your brush over them a lot to get a good colour pay off. The shade Burnt Plum is a nice deep, well, plum shade. The shade pixie, is a light pink colour, almost metallic, with blue and purple shimmers, this particular shade looks amazing over the Maybelline Colour Tattoo in Pink Gold. They are almost creamy in the texture, I know from past experience with baked eyeshadows, that some can tend to be extremely powdery and fly all over the place and translate better on a full swatch on your finger than with a brush on to your eye. This is not the case with these, they are very nice smooth, silky, creamy, richly pigmented shadows.
 
Ways To Apply: I mainly apply these with a soft bristled brush with the lighter colour and place it all over my lid, then use a slightly stiffer brush and black the Burnt Plum shade on my outer corner and crease (I also use a smudge brush to mirror that on my bottom lash line). Really, the only ways you can apply these shadows are with a brush or with your fingers. With a brush you are going to get a ore precise look and you are going to have more control with where the product goes and where you blend it out. With your fingers you are going to get a more quick, messy look. This doesn't always look terrible, it just depends how you work with it. Don't attempt to apply the colour into the crease with your fingers, stick with all over the lid and the outer corner, so you can still maintain control and a look like you have spent more time on it rather than like you have stamped the eyeshadow colour on your eyes!
 
I've Applied Far Too Much Product!: Don't worry! I'm here to help! Basically, the most obvious way of fixing it is just keep blending out the shadow with a blending brush, until you get it to the right amount of colour that you want. Another way that I have found out, when I have applied a mountain of product (which is quite often!) is to get a Q-Tip (Cotton Bud) and just wipe it over, the bud will remove some of the product, meaning you can either build on top of that if it has taken off too much, or just leave it if it took off the perfect amount and just blend out the edges.
 
When Do I Apply These?: Personally, I apply these after foundation and when I have done my eyebrows, before I have done concealer, powder etc... mainly because, then you don't have to worry too much about fall out. It is easier to fix when it has landed on foundation rather than layers of your face makeup. The reason being is that you can just run your foundation brush under your eyes and remove any fall out, without removing a big patch of your face makeup.
 
Would I Recommend These?: Of course! I love these shadows and for the price that they are, they are an amazing deal. The quality is there, they are by no means like cheap eyeshadows, the packaging is quite sturdy and holds up well. I haven't took these on holiday yet so I don't know how well they hold up on the plane, if they will crack or anything, but if they do, I will update this post with the results and some pictures.
 
 
Hope This Helps!
xox

Wednesday, 8 February 2012

ELF All Over Colour stick (in pink lemonade) - review

Hey, I'm back.... again! I'm here with a review on my ELF All Over Colour Stick in pink lemonade.


I love this product! In the tube you get 4g of product which, again, for £1.50 is amazing! As you can see from the swatch, with 1 swipe the colour is quite sheer but it gives off a very flattering sheen. The smell of the product is their sugar orange scent, which I can definitely say it does smell like that, it is very sweet and smells like an orange flavoured sweet.

This is very flattering on the cheeks if you use the right amount, which is, for me, 2 dots on the cheek and blended out into the temple/hair line with a stiff brush or preferably a stippling brush.

On the cheeks it adds a nice, subtle glow. I do not reccomend using this on the lips or eyes as i don't think it would look very good on the eyes (it might do with other colours, but not the pinks) and you don't want to put a product on your face that has also been touching your lips, also the texture on the lips, as i find, is a bit drying. However, on the cheeks it looks amazing, and the texture is creamy, silky and very smooth.

I would reccomend this to everyone and I will proberbly buy some other shades and see how I like them.

Hope this helps!
xoxoxo

ELF Eyelid Primer (in golden) - review

Hey! I'm back with another ELF review! As you guessed from the title it is on the ELF Eyelid Primer (in golden).

                             (sorry about the darkness, I don't have very good lighting)

So, first of all this product is £1.50 as it is from there essential line. You get 5ml in a tube which isn't bad at all!

I really love this primer. It is a great,creamy consistancy, it leaves a flattering shimmer on the eyelid - the only one that doesn't do this is the normal shade in sheer. I have been using this product for a long time now and it does wonders! I put it to the 24hr test and it lasted a good 8-10 hours which is amazing! However, I do find that whilst putting the eyeshadow on, it doesn't stick amazingly, it is only after you have applied your eyeshadow and it has been on for about 5 minutes that it really sticks onto the product and doesn't budge.

For me, it seems to dry after the eyeshadow is on top of it, and it seems to grab the eyeshadow with it. This is an amazing primer! Proberbly not the best out there, but for £1.50 and it is this good, I really reccomend it and will be stocking up on this product myself!

However, i do find that because it is in a tube with a sponge applicator, alot of the product is left on the sides and you cant really get it out unless you swirl the sponge round the sides of the tube.

I hope you found this useful and I hope you will purchase this in the future!!
xoxox